- Joined
- Jan 23, 2012
- Messages
- 504
- Reaction score
- 73
This was originally meant to be just for Future8Hokage, but i thought i might make it a thread to help out those who want to make some simple avatars. This is pretty basic and doesn't cover anything in great detail. But enjoy..
Also i use gimp, so it makes it difficult to use screenshot examples when most have Photoshop.
Here are some examples of some avatars before i start typing like crazy.
This may be a long post.. So here goes. I hope this isn't to much.")
Also i use gimp, so it makes it difficult to use screenshot examples when most have Photoshop.
Here are some examples of some avatars before i start typing like crazy.
You must be registered for see images
You must be registered for see images
You must be registered for see images
You must be registered for see images
This may be a long post.. So here goes. I hope this isn't to much.
#1. I prefer to use stocks, they are much easier than finding/making your own background. DeviantArt is usually a good place to search for these. If you prefer to use renders or just want to use them, make sure you hold 'Ctrl' when resizing them down to the size you want, it will keep it all in proportion, if that makes sense.
#2. You will need to download some fonts before you start. Find some cool bulky, fancy, flashy, thick, awesome font's that you like. They standard font's aren't usually that good, and some good text can really bring out/finish off an avatar or signature. Just try not to use text on every piece of work.
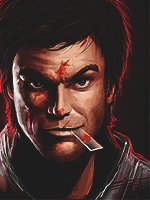
#3. Once you have a good stock, make sure that it has some nice colors in it, and would work well as an avatar. Let's take this one for example.
#4. Make sure you resize it properly like i said, otherwise it will end up something like this, all stretched and it's not very good.
#5. Once you have it the way you want, enhance it with the 'Sharpen' tool, just so it looks more HQ. Then play around with the contrast and brightness settings along with the 'Levels' settings, just so the right things are highlighted and the right parts are dark. So it should look roughly like this
Original ^^ New one ^^
Can you see how darkening his jacket brings out the hearts colour?
#6. Now is when you put in your effects. This stock is pretty good the way it is though, so i just enhanced the blood and the heart by brushing over it with a softer red and blue. >
The heart now slightly darker, but still bright and the blood has a red glow to it.
You'll have to download the effects as well, although you can find them on DeviantArt and google. Just type in 'C4D effect packs' or 'C4D packs' and there should be plenty.
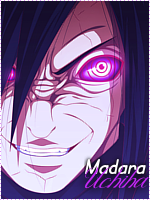
#7. Once you put in some effects, any you like, it's time for text and border. As you can see with the avatar i have now, i put text on it, but only because it was 150x200. I think i was lazy with my original one and didn't put text on it. But the border is simple, just a simple blue or black border is fine, just 1 px. The finished product is in the first spoiler i put up.
I hope this helped a few out there who want to get into GFXing, not that this was very informative. If you want anymore help or to learn something specific such as c4d use, text glow, different borders etc... just ask. =D
#2. You will need to download some fonts before you start. Find some cool bulky, fancy, flashy, thick, awesome font's that you like. They standard font's aren't usually that good, and some good text can really bring out/finish off an avatar or signature. Just try not to use text on every piece of work.
#3. Once you have a good stock, make sure that it has some nice colors in it, and would work well as an avatar. Let's take this one for example.
You must be registered for see images
You must be registered for see images
You must be registered for see images
You must be registered for see images
Original ^^ New one ^^
Can you see how darkening his jacket brings out the hearts colour?
You must be registered for see images
The heart now slightly darker, but still bright and the blood has a red glow to it.
#7. Once you put in some effects, any you like, it's time for text and border. As you can see with the avatar i have now, i put text on it, but only because it was 150x200. I think i was lazy with my original one and didn't put text on it. But the border is simple, just a simple blue or black border is fine, just 1 px. The finished product is in the first spoiler i put up.
I hope this helped a few out there who want to get into GFXing, not that this was very informative. If you want anymore help or to learn something specific such as c4d use, text glow, different borders etc... just ask. =D
Last edited: