- Joined
- Mar 15, 2012
- Messages
- 3,726
- Reaction score
- 690
This tutorial has been made on Pavoneo's request and therefore is also a bit focused on GIMP. Before I start the tutorial I want to say that I dont work with GIMP and that I only downloaded it to get an idea about how GIMP works, all the images I am gonna use are from photoshop, but the idea is the same and PS works almost the same. Also please feel free to fill in what I missed, because I learned how to make these kind of air sigs by myself because of the lack of tutorials online and I only made 5 so far.
Before I forget to mention it, in this tutorial I will use 3 different air sigs as examples. Plz dont copy any of the actual air sigs I posted in this tutorial.
Video
Brushes
Colors you want to use
Step 1:
Step 2:
Step 3:
Step 4:
Ok if you want to paint around the backgroung (easier) like in teh Tenten sig, go read step 5. If you want to paint on top of the bakcground like in the sephiroth render (little bit harder), skip step 4 and continue reading at step 6. If you want both, read both of them xd
Step 5:
Step 6:
Tips and tricks
This is usually what I do and I think I have told everything what I do in order to create an air sig, if you any questions VM/PM me and I will respond ASAP.
Have a nice day,
Eternity000
Before I forget to mention it, in this tutorial I will use 3 different air sigs as examples. Plz dont copy any of the actual air sigs I posted in this tutorial.
Video
Sorry no audio, guess I am too lazy xd, this is just as support so you can see what I mean with the text
You must be registered for see links
Brushes
Ok as for brushes on gimp there are way too much out there and I tested out like hundreds and turns out they all are usefull :S
If you are using Adobe Photoshop like me, all the brushes I use are from this site:
You must be registered for see links
this is where I downlaoded it. The best imo is the odysee package. If you dont know how to add brushes on gimp:
You must be registered for see links
If you are using Adobe Photoshop like me, all the brushes I use are from this site:
You must be registered for see links
and if you dont know how to add brushes to PS
You must be registered for see links
Colors you want to use
What I usually do is before I start is to look at the render I am about to gonna use. Then imagine a color which looks nice with the render (1) and then a second color (2) which makes the render pop out of the background. This tenten air sig for example has a pink base color (1) and a white background around Tenten (2) to it so tenten stands out of the pink.
In this tutorial I am going to keep it at 2 colors. Color 2 is for the background and color 1 is is to make the render stands out.
You must be registered for see images
In this tutorial I am going to keep it at 2 colors. Color 2 is for the background and color 1 is is to make the render stands out.
Step 1:
Ok when you have the colors in mind open up the render, then open a window of 2000x2000 so we have a lot of room to work with. And copy/paste the render in the big window. For GIMP users also open up the tab "layers" so you can see all the layers and can arrange them. For some reasons I need to open it every time Istarted it up. Now put the layer with the render in the middle and open up 2 layers above it and 2 layers beneath it for now.
Step 2:
Select the layer above the render and pick up any brush you want, this brush has color 2. This brush will cover up the parts you dont want to see (for example legs). However instead of painting his entire legs you do it this way: use the brush and paint around the waist and then with the eraser (on opacity 25%) start erasing the legs untill the the render blends well with the just added paint layer.
How it should look by now:
As you can see I putted up a small black cloud around the waist and the legs were erased
How it should look by now:
You must be registered for see images
As you can see I putted up a small black cloud around the waist and the legs were erased
Step 3:
Now we work on the layer below the render. We are still going to use a brush with color 2. Now we are going to paint the background of the render. Search for any brush you want and paint around the render it will looks a bit like this:
You must be registered for see images
Step 4:
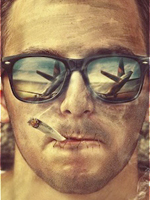
Ok now you got a nice background we are going to use a brush with color 1. You can decide if you want this color be around the background like here:
or do you want it to blend with color 2 like here:
Note: color 2 is white and color 1 is pink
You must be registered for see images
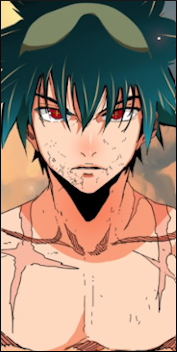
color 1 is dark red and color 2 is black
You must be registered for see images
Ok if you want to paint around the backgroung (easier) like in teh Tenten sig, go read step 5. If you want to paint on top of the bakcground like in the sephiroth render (little bit harder), skip step 4 and continue reading at step 6. If you want both, read both of them xd
You must be registered for see images
You must be registered for see images
Step 5:
Ok in this step you will ony use the bottom layer (the lowest layer in the layer tab). All you need to do now is pick up a brush and select color 1. Then paint around the edge of the background. Because this is the lowest layer, your background will not be effected by it. You will only see the brush's effect on the still empty spaces. Continue with this untill you think you are statisfied. This is how it could look like:
In this example color 1 is blue and color 2 is white
You must be registered for see images
Step 6:
Ok this is a bit harder then step 4 , but don't panic it's not that much harder ") What you need to do here is pick up a brush you want and give it color 1, now make some top layers. You are going to paint on the new top layers with the color you want. However this time you dont need to worry if your top layers are messing up your background. When you are finsihed with the top layers, it should look something like this:
What you need to do here is pick up a brush you want and give it color 1, now make some top layers. You are going to paint on the new top layers with the color you want. However this time you dont need to worry if your top layers are messing up your background. When you are finsihed with the top layers, it should look something like this:
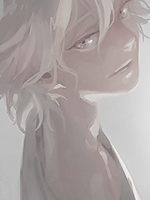
Now comes the bit tricky part, we are going to chage the opacity of the layers with color 1. Let's say change it to around 80% and now it looks like this:
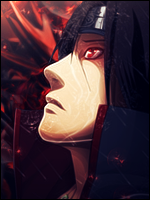
If you have read step 4, the picture will look like this"
If you want you can use a different opacity for the layers, but 80% was always good enough for me.
What you need to do here is pick up a brush you want and give it color 1, now make some top layers. You are going to paint on the new top layers with the color you want. However this time you dont need to worry if your top layers are messing up your background. When you are finsihed with the top layers, it should look something like this:As you can see the red is not blending good with the black background
You must be registered for see images
Now comes the bit tricky part, we are going to chage the opacity of the layers with color 1. Let's say change it to around 80% and now it looks like this:
As you can see the red does now blends much better with the background:
You must be registered for see images
If you have read step 4, the picture will look like this"
You must be registered for see images
If you want you can use a different opacity for the layers, but 80% was always good enough for me.
Tips and tricks
- Always make an air sig with a white background. When you use the transperant background it will looks very different then what you had in mind. I am also sorry for using some images with a transperant background my fault. But remember when you are done with the air sig, always save it as a pgn-file and remove the white background before you save it, to get a transperant background.
IN short work with a white baclrgound, but save it as a pgn file with a transperant background
Transperant background:
White background:
my fault. But remember when you are done with the air sig, always save it as a pgn-file and remove the white background before you save it, to get a transperant background.IN short work with a white baclrgound, but save it as a pgn file with a transperant background
Transperant background:
You must be registered for see images
White background:
You must be registered for see images
When you want to use more then 2 colors, first start of with using different tints for color 1 and slowly swap the tints for different colors. When you suddenly go from 2 colors to 3 you will have a hard time thinking about how to paint with the third color so it looks good with the other 2
This is usually what I do and I think I have told everything what I do in order to create an air sig, if you any questions VM/PM me and I will respond ASAP.
Have a nice day,
Eternity000
Last edited: