- Joined
- May 15, 2013
- Messages
- 58,956
- Reaction score
- 3,171
Note: I am doing this for a premium avatar, the sizes futher down would obviously be different for standard avatars, but I’m certain that you can figure that out yourself… You could even use this to do sigs like this or w/e.
I also did intentionally pick a dirtier scan for the sake of this tutorial. If you can pick a cleaner one, I’d urge you to do it which would likely allow you to skip the “cleaning” part.
Firstly, crop the area that you’ll make your avatar out of but larger than it’d be when shrunk down to size. Try to leave it so the white is all connected on the outside of the character.
After the initial crop, make sure to crop out any panel borders if there are any.
Next, we will be getting rid of the unnecessary lines on the outside of the character. Make a new layer select a plain white hard brush, fairly large but not too big. Say 25px. If it’s a smaller panel to start with and closer to the avatar size you would obviously adjust the size accordingly. I would guess between 6-20px. If it’s close between two lines of the character, just use a smaller brush size or even make the selection with the Pen Tool and fill it. Erase by painting over in the new layer. If you go over the art of the character just use the eraser tool. This is the reason for doing it in a new layer…
Now, we're going to clean the scan if need be. Usually a scan from *********** won't require cleaning, but this isn't absolute, and I think usually older ones from there are not near as good quality-wise as their newer current ones.
Select the background layer. Click on “Create new fill or adjustment layer”:
And choose “Levels”.
Zoom in to about 350% to get a good look at the noise/dirt. On the right side which is the white, put in 230. This should clean all of the singular grey pixels off of the white. Put black to 30 this should like-wise make the black clean.
Click on the background layer. Go at the top and click “Filter” go down to “Sharpen” on the dropdown menu, then across to “Smart Sharpen”. Make your settings as per these:
Click on the “Levels” layer once. Go to “Create new fill or adjustment layer” again, click Exposure. Make the settings as per these:
Right click any layer and click “Flatten image”. Use the magic wand tool to pick up the white background. Go to “Select” at the top and choose “Grow”.
Zoom in a bit and if you see any parts like this use the lasso tool whilst holding in the shift key to add it to your selection.
Create a new layer and pick a grey colour around the middle of the vertical way down on the left. I’ll be using #9e9e9e.
Hit Shift + F5 make sure it’s set to “Foreground colour” and click Okay. Deselect the selection. Now, change the layer’s blending mode to “Multiply”.
Select and crop all but a little of the grey to the line, like so:
Image > Image Size > Resize. Make sure it looks like the following disregarding the sizes.
Change the height to 294 and click okay.
Select the rectangle marquee tool. At the top change the settings to this:
If you click once it’ll bring up the area where it’ll crop, if you hold down left click and move the cursor you can change it to different areas. Use this to select the best looking crop.
When selected go to Image > Crop. Afterwards deselect the selection.
Now, go to: Image > Canvus Size. Change one of the the width or height measurements to pixels instead of whatever the default may be. Punch in 150 for the width and 300 for the height. Click okay.
New layer > Ctrl + A. Select #d5d5d5 for Foreground or Primary colour. Right click the avatar and click “Stroke”.
Settings:
After that, select plain white and stroke 2px, then plain black and stroke 1px.
File > Save as… > Format: should be PNG > Name it > Press save.
I also did intentionally pick a dirtier scan for the sake of this tutorial. If you can pick a cleaner one, I’d urge you to do it which would likely allow you to skip the “cleaning” part.
Firstly, crop the area that you’ll make your avatar out of but larger than it’d be when shrunk down to size. Try to leave it so the white is all connected on the outside of the character.
You must be registered for see images
You must be registered for see images
You must be registered for see images
Select the background layer. Click on “Create new fill or adjustment layer”:
You must be registered for see images
And choose “Levels”.
Zoom in to about 350% to get a good look at the noise/dirt. On the right side which is the white, put in 230. This should clean all of the singular grey pixels off of the white. Put black to 30 this should like-wise make the black clean.
You must be registered for see images
You must be registered for see images
You must be registered for see images
You must be registered for see images
You must be registered for see images
Hit Shift + F5 make sure it’s set to “Foreground colour” and click Okay. Deselect the selection. Now, change the layer’s blending mode to “Multiply”.
You must be registered for see images
You must be registered for see images
You must be registered for see images
Select the rectangle marquee tool. At the top change the settings to this:
You must be registered for see images
If you click once it’ll bring up the area where it’ll crop, if you hold down left click and move the cursor you can change it to different areas. Use this to select the best looking crop.
You must be registered for see images
You must be registered for see images
New layer > Ctrl + A. Select #d5d5d5 for Foreground or Primary colour. Right click the avatar and click “Stroke”.
Settings:
You must be registered for see images
File > Save as… > Format: should be PNG > Name it > Press save.
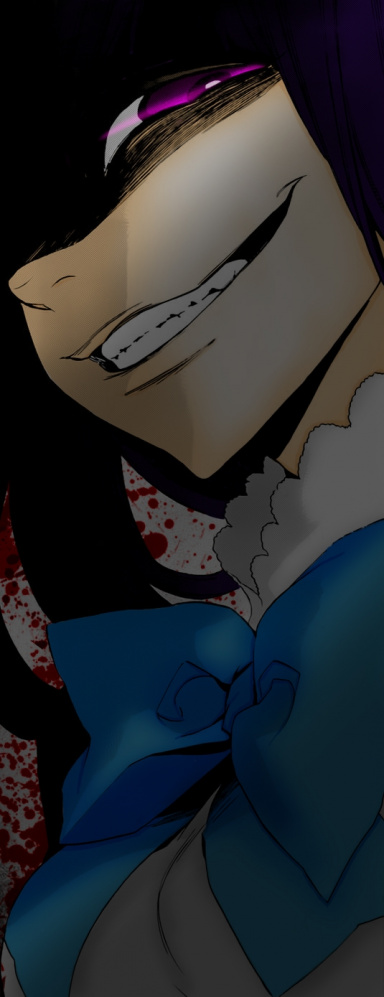
That’s it, here is the finished product!
You must be registered for see images
I hope this helps someone... anyone...  Have a good day. :bdpf:
Have a good day. :bdpf:
Last edited: