Tutorial: Basics of Manga Coloring for The Gimp by solar_panda
The Gimp seems to be a headache and a half for some people, so I thought I'd try to give them a hand by sharing a tutorial, including a lot of stuff I learned through trial and error. But, if you're used to your photo editing software, hopefully this tutorial will still be helpful if you're still a little new to manga coloring.
I hope it helps!
Subject: Manga Coloring 101 for The Gimp
Program: The Gimp 2.4
Translatable?: Yes
Difficulty: Hopefully beginner
Sample from: Tsubasa Reservoir Chronicle
This tutorial focuses a lot of emphasis on the functioning of The Gimp.
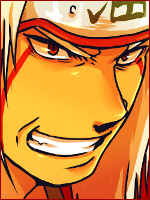
Going from:
Pre-tutorial notes
Setting up The Gimp
Before we get going, let's get The Gimp set up properly. You have the main window with all the tools up, right? Good! Now, at the very bottom of that menu, there should be your tool options, like your brush size, shape and opacity. If it's not there, go to File -> Dialog -> Tool Options. This will open another window with your tool options in it. Right, next we'll need to make sure our Layers dialog is open. It looks like this. If it's not, go to File -> Dialog -> Layers. At this point, you should have your tool options and layer dialog open. I personally like to have my brushes dialog open, so I can switch back and forth between brush sizes with ease. To do this, go to the main window and double-click on the brush, located here. There, now you have all the dialogs you'll need open: Tool Options, Layers, and Brushes.
Tips for picking an image
Some art styles are easier to color than others. I recommend styles with simple lines and not too much detail. Tsubasa Reservoir Chronicle and Angelic Layer by CLAMP as well as Bleach and maybe Eureka 7 are examples. That's not to say you can't work with more elaborate styles, but it may be more difficult if you're just beginning.
Okay, I'm starting for real now. XD;;;
Step 1
Get your base image. This is mine, one of jlarinda's bases:
Now look at the info bar above your image. It will have your file name, then in parenthesis it will tell you the setting (RGB, Grayscale, or Indexed) and how many layers there are. Make sure your image is set to RGB. If not, go to Image -> Mode -> RGB.
Step 2
Let's slap some color on this bad boy. Make a new layer by clicking the button circled in pink here
A menu will pop up. Make sure the width and height of the new layer is the same as your image (100 x 100 in this case) and Transparency is selected. Good! Hit OK. Now set the layer to Multiply (the selected layer is highlighted in gray on the Layers dialog; make sure you have the new layer selected). Let's pick some colors. For Syaoran's hair, I'm going to do 7b6440. To input colors, double click on the topmost of the little color squares at the bottom of your main window. Then make sure the icon on the farthest left is selected and put the number I just gave you where it says HTML notation. (A picture if you need it.)
Now select the paint brush and color in his hair. Mine came out like this:
Just as a note, I use the hard circle brushes. They're the ones that are black dots. The fuzzy ones have a ring of blurry gray around them.
Step 3
Now let's color the rest. I purposefully make the colors a little darker than I want them because of the stuff we're going to do at the end. Don't worry if things look a little off right now. We can always adjust colors and opacity later. :3
To make life easy, make a new layer for each color. For this step, they'll all be set to Muliply. For the skin, I did e3c590. For his shirt, it's 65b39a and his cape is a68c63. And it looks a little something like this:
You know, I think Syaoran looks better in green. Okay, before you give me that horrified look, I did it on purpose. When a color doesn't look quite right, go to Colors -> Hue-Saturation and fiddle around a bit. I find I like 7eb364 better. So, let's re-color his shirt in a simple way. Go to the shirt layer on the Layer dialog and right-click. Select "Alpha to Selection." See? Little marching ants. Now, go to the fill tool and dump some 7eb364 in there. Great! This trick is also helpful if you want to add gradient or a pattern to a specific part of the image. Color it in flat color, then just use the "Alpha to Selection" trick. To get the marching ants to go away, hit ctrl+shift+a or go to Select -> None.
This is what it looks like after tweaking:
Step 4
Time to add our shading and highlights. It's not scary, I promise. Now, let's do the skin first. A simple way to pick a shading color for skin is to get the original skin color (using the eyedropper on the skin layer, if need be), opening that color dialogue you've been pasting color codes into and knocking the value down a touch and the saturation up a little. I chose d7ba86. Now take a smallish brush and swipe it around where you'd like the shading to be.
This is how it looks before I blend it:
Eww, not attractive. I'm going to slap on the rest of the shading. Then I'll show you how to blend it.
Step 5
That's clearly not very attractive. So, it's time to blend those shading layers. I'm going to use the smudge tool. I set it at 70% opacity and use one brush size bigger than the one used to color on the shading. In this case, I'll be using the 5px hard circle brush. So, I just smudge it around until it looks good.
Nice and blended. Feel free to use the blur tools (they're under Filters). I ended up duplicating the shading layer for the skin and setting it to 70% opacity (still on Multiply) because it was too faint for me.
Step 6
Time to add some highlights, specifically to Syaoran's hair. Let's grab the base color for Syaoran's hair (what we initially colored it) and kick the value up and saturation down. I'm using a4895f. Now, make a new layer and set it to Screen. Color in the highlights. I color them opposite where I put the shading for the hair. It looks like this before I blend it:
Ahaha, he looks a little like a skunk, right? Now, we're going to blend it as we did before. And it'll look something like this:
Congrats! The hardest part is over. But we still have a little more to go!
Step 7
Now, we're going to adjust the opacity of the layers a bit I reduced the shading layer for the hair to 80% opacity and the highlights to 50%. Let's remove the background now. Go to your base layer. It'll say Background in bold. Right click on that layer in the Layers dialog and select "Add Alpha Channel." Alright, now it can handle transparency. Go in with the eraser tool and take out the background. I like to put a layer of color under the background layer just to help me out. Now it looks something like this:
Step 8
Time for a proper background and special effects, don't you think? I put this
by ownthesunshine as the background by pasting it into a new layer and dragging it to the bottom. Now we're going to add effects. Make a new layer and fill it with 314f74. Set it to subtract. Make another layer on top of that one and fill it again with 314f74 and set it to screen. Set both layers to 60% opacity. This is how to make an exclusion layer in The Gimp. I didn't come up with it; I first saw it in one of dragonsquee's tutorials. Take the base layer, duplicate it, and drag it to the top. Set this to Overlay at 40% Now, make another layer and fill it with ffcbcb. Set it to Overlay at 40%. You'll get this:
You can stop here, of course, but I'm going to add some more oomph. Take this
texture by silverqe and set it to Screen at 50%. Then, take this grungy texture by toybirds and set it to Divide at 20%. And here we have the final product:
I saved it as a .png with the compression level at 1.
There not so bad, right? Please don't follow this tutorial exactly. Fiddle with colors and effects. Play with layer settings and opacity. Most of all, have fun!
Wow that took forever. Finished it in spite of an epic power outage too. XD;;
----------------
I found this while searching for Gimp tutorials ^^ Hope it will be usefull for someone
----------------
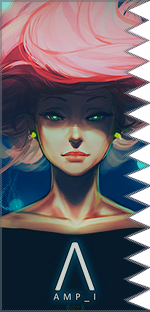
I had not much time , so I wasnt following all the points and I came up with this :
Its not perfect or even good , but its good enough for me ^^
----------------
You can check this tutorial here :
Enjoy !
The Gimp seems to be a headache and a half for some people, so I thought I'd try to give them a hand by sharing a tutorial, including a lot of stuff I learned through trial and error. But, if you're used to your photo editing software, hopefully this tutorial will still be helpful if you're still a little new to manga coloring.
I hope it helps!
Subject: Manga Coloring 101 for The Gimp
Program: The Gimp 2.4
Translatable?: Yes
Difficulty: Hopefully beginner
Sample from: Tsubasa Reservoir Chronicle
This tutorial focuses a lot of emphasis on the functioning of The Gimp.
Going from:
You must be registered for see images
to
You must be registered for see images
Pre-tutorial notes
Setting up The Gimp
Before we get going, let's get The Gimp set up properly. You have the main window with all the tools up, right? Good! Now, at the very bottom of that menu, there should be your tool options, like your brush size, shape and opacity. If it's not there, go to File -> Dialog -> Tool Options. This will open another window with your tool options in it. Right, next we'll need to make sure our Layers dialog is open. It looks like this. If it's not, go to File -> Dialog -> Layers. At this point, you should have your tool options and layer dialog open. I personally like to have my brushes dialog open, so I can switch back and forth between brush sizes with ease. To do this, go to the main window and double-click on the brush, located here. There, now you have all the dialogs you'll need open: Tool Options, Layers, and Brushes.
Tips for picking an image
Some art styles are easier to color than others. I recommend styles with simple lines and not too much detail. Tsubasa Reservoir Chronicle and Angelic Layer by CLAMP as well as Bleach and maybe Eureka 7 are examples. That's not to say you can't work with more elaborate styles, but it may be more difficult if you're just beginning.
Okay, I'm starting for real now. XD;;;
Step 1
Get your base image. This is mine, one of jlarinda's bases:
You must be registered for see images
Now look at the info bar above your image. It will have your file name, then in parenthesis it will tell you the setting (RGB, Grayscale, or Indexed) and how many layers there are. Make sure your image is set to RGB. If not, go to Image -> Mode -> RGB.
Step 2
Let's slap some color on this bad boy. Make a new layer by clicking the button circled in pink here
You must be registered for see images
You must be registered for see images
Now select the paint brush and color in his hair. Mine came out like this:
You must be registered for see images
Just as a note, I use the hard circle brushes. They're the ones that are black dots. The fuzzy ones have a ring of blurry gray around them.
Step 3
Now let's color the rest. I purposefully make the colors a little darker than I want them because of the stuff we're going to do at the end. Don't worry if things look a little off right now. We can always adjust colors and opacity later. :3
To make life easy, make a new layer for each color. For this step, they'll all be set to Muliply. For the skin, I did e3c590. For his shirt, it's 65b39a and his cape is a68c63. And it looks a little something like this:
You must be registered for see images
You know, I think Syaoran looks better in green. Okay, before you give me that horrified look, I did it on purpose. When a color doesn't look quite right, go to Colors -> Hue-Saturation and fiddle around a bit. I find I like 7eb364 better. So, let's re-color his shirt in a simple way. Go to the shirt layer on the Layer dialog and right-click. Select "Alpha to Selection." See? Little marching ants. Now, go to the fill tool and dump some 7eb364 in there. Great! This trick is also helpful if you want to add gradient or a pattern to a specific part of the image. Color it in flat color, then just use the "Alpha to Selection" trick. To get the marching ants to go away, hit ctrl+shift+a or go to Select -> None.
This is what it looks like after tweaking:
You must be registered for see images
Step 4
Time to add our shading and highlights. It's not scary, I promise. Now, let's do the skin first. A simple way to pick a shading color for skin is to get the original skin color (using the eyedropper on the skin layer, if need be), opening that color dialogue you've been pasting color codes into and knocking the value down a touch and the saturation up a little. I chose d7ba86. Now take a smallish brush and swipe it around where you'd like the shading to be.
This is how it looks before I blend it:
You must be registered for see images
Eww, not attractive. I'm going to slap on the rest of the shading. Then I'll show you how to blend it.
You must be registered for see images
Step 5
That's clearly not very attractive. So, it's time to blend those shading layers. I'm going to use the smudge tool. I set it at 70% opacity and use one brush size bigger than the one used to color on the shading. In this case, I'll be using the 5px hard circle brush. So, I just smudge it around until it looks good.
You must be registered for see images
Nice and blended. Feel free to use the blur tools (they're under Filters). I ended up duplicating the shading layer for the skin and setting it to 70% opacity (still on Multiply) because it was too faint for me.
Step 6
Time to add some highlights, specifically to Syaoran's hair. Let's grab the base color for Syaoran's hair (what we initially colored it) and kick the value up and saturation down. I'm using a4895f. Now, make a new layer and set it to Screen. Color in the highlights. I color them opposite where I put the shading for the hair. It looks like this before I blend it:
You must be registered for see images
Ahaha, he looks a little like a skunk, right? Now, we're going to blend it as we did before. And it'll look something like this:
You must be registered for see images
Congrats! The hardest part is over. But we still have a little more to go!
Step 7
Now, we're going to adjust the opacity of the layers a bit I reduced the shading layer for the hair to 80% opacity and the highlights to 50%. Let's remove the background now. Go to your base layer. It'll say Background in bold. Right click on that layer in the Layers dialog and select "Add Alpha Channel." Alright, now it can handle transparency. Go in with the eraser tool and take out the background. I like to put a layer of color under the background layer just to help me out. Now it looks something like this:
You must be registered for see images
Step 8
Time for a proper background and special effects, don't you think? I put this
You must be registered for see images
You must be registered for see images
You can stop here, of course, but I'm going to add some more oomph. Take this
You must be registered for see images
You must be registered for see images
I saved it as a .png with the compression level at 1.
There not so bad, right? Please don't follow this tutorial exactly. Fiddle with colors and effects. Play with layer settings and opacity. Most of all, have fun!
Wow that took forever. Finished it in spite of an epic power outage too. XD;;
----------------
I found this while searching for Gimp tutorials ^^ Hope it will be usefull for someone
----------------
I had not much time , so I wasnt following all the points and I came up with this :
You must be registered for see images
Its not perfect or even good , but its good enough for me ^^
----------------
You can check this tutorial here :
You must be registered for see links
Enjoy !