You must be registered for see images
First of all, I will note that I am horrible at writing tutorials and I haven't written one in years. So I hope that you'll understand and if you have any questions after reading this tutorial, please ask via a post in this thread so I can respond in a manner that everyone can see. (I will also add a questions & answers table to the opening post after a question has been added, so its easier to find. Resources
You must be registered for see links
You must be registered for see links
Useful Links
You must be registered for see links
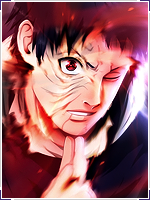
Removing the white of a Manga scan The very first thing you will have to do is to find the page which you want to make a signature/tag out of, I recommend using *********** scans as they are the highest quality and give the best results after the white is removed. Find the scan you want and copy it by right clicking the scan and then click copy. Then open Photoshop and make a new project by going to File > New, the dimensions should be automatically set to the size of the image contained within your clipboard. (The image you just copied.) Go ahead and press Okay and Paste the manga panel into Photoshop by pressing Ctrl + V. ( Or go to; Edit > Paste ) Now download my White Removal Action from the link above and open it in Photoshop. If you haven't already, you will need to find the Action window by going to; Window > Actions in Photoshop. (Top menu) In the Action window, you should find a folder named Zeuke's Actions and within it you should find my White Removal Action. Select the action and press the Play icon at the bottom of the Action window. (Make sure you have selected the layer that contains the manga panel!) This should create a new layer containing the manga panel without the white in it. Now you can go ahead and copy that layer by pressing; CTRL + A to select the entire canvas and then CTRL + C to copy it. Making the scan into a signature/banner/avatar Note; I will be using my template in this tutorial! Download and open up my Template PSD from the link above. This will give you a template at the size of 600 x 300 with a striped outline and a layer setup to make it easier to use. In my PSD, you will find a Clipping Mask Layer called; Overlayer. Paste the manga panel render under this to make it into a clipping mask to fit into the gray box. (You can do this by selecting the Main Shape layer and pressing; CTRL + V.) You can alter the color of the box if you want, but that won't be needed for this example as you are going to add a texture over it instead. I recommend using a Stone Texture which can be found all over Google,DeviantART or other sites. (Simply search; Stone Texture) Find a texture you like, this is the one I normally use;
You must be registered for see links
, but you can use any you wish. In my template, paste it under the manga scan layer in the same fashion as we did with the manga scan eariler. You may want to resize the texture layer depending on its original size, I normally do this. (You can do it by selecting the texture layer and pressing; CTRL + T which will make it a selection. Hold down shift and start dragging one of the corners, this will keep the proportions as it is while making the texture smaller.) Now to make the black on the manga also stand a bit out with the texture, we're going to add a texture over that as well. I recommend using a form of Scratch Texture which can also be found on Google or other sources. This is the one I will be using;
You must be registered for see links
. Copy the texture you want and apply it like you did with the Stone Texture, but this time add the layer containing the Scratch Texture above the layer that contains the manga scan. (I recommend that the scratch texture you will be using has a darker background to it, to make it easier to use.) Now you will notice that the new texture will cover up the entire signature/tag/avatar and not just the black. To change this, go to filter options right over the layers and change it to something else. (I recommend that you use either Screen or Color Dodge.) This will make the Scratch texture appear mostly on the black, but you may still be able to see it on the outside as well. To remove this completely, make a selection of your manga scan layer. (This can be done by; holding down CTRL and pressing the preview image on the manga scan layer.) After doing that you will need to inverse the selection. You do this by going to Select > Inverse, after doing this, select your Scratch Texture layer again and press Delete on your keybaord to delete the selection. Now go to Select > Deslect to remove the selection and you should notice that the Scratch Texture will only be visible at the black areas. Now go to File > Save as and save it as a PNG for the highest quality and transparent bar around the border. You can see my result at the top of this post. |
Last edited: