- Joined
- Aug 5, 2011
- Messages
- 8,386
- Reaction score
- 788
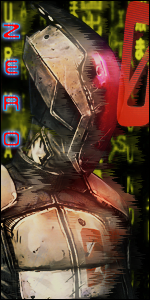
First Tutorial ^^ so easy on the criticism, and this is for people who didn't know how to do this,so please no replying saying this is stupid or I already knew this... Ok so in this tutorial you'll be learning how to do this :
Also let the Pic Load it's 14MB If this pic doesn't work then you can see it
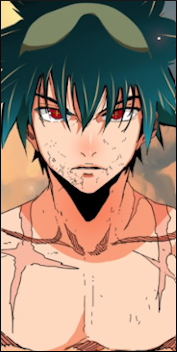
The Pic ( I already added the bottom brush thing in the bottom ):
This Tutorial was made on Photoshop CS5.1 but it should be the same for CS3 and up.
Let's start.
1. Open the picture make sure you double click the Lock key on that layer, it will ask what to name it, just keep it layer 0, now make a new layer ( Ctrl-Shift-N ) and hit enter , then press ( Shift-backspace key ) this will bring up the Fill menu, set it to "50% Grey", it should look something like this :
2. Next Go to Filter > Noise > Add Noise , make sure the amount is set to 400% , Gaussian and Monochromatic, then press ok. You should have something like this now :
3. Now go to Filter > Blur > Blur , this will blur the noise a little bit so we can have a nice Rain effect in the end, now go to Image > Image Rotation > 90 CW, you'll notice that both layers are turned 90 degrees, you'll know why in the next step. Now go to Filter > Stylize > Wind , and make sure the Method is set to "Blast" , and the direction from "Right". now go to Image > Image Rotation > 90 CCW , you should have something like this :
4. Now hit (Ctrl-I ) to Invert the colors, Go to Filter > Other > Offset, Now change the vertical amount until you see the white Line crossing the Image Like this :
Now we want to remove this so that the rain won't seem like it's limited/ Cutting. Click ok and then using you're "Clone Stamp" Tool, Hold alt at any part of the "rain" and then brush over the white line until it's completely gone Like this :
5. Go to Edit > Define Pattern, and let's name it "Rain" click ok, now you can delete the actual Rain Layer cause it has been saved in the Pattern Menu, so go ahead and delete it, Now make a New layer ( Ctrl-Shift-N ) and press ( Shift-Backspace ) and select 50% Grey again.
6. Right click on the new layer and select "Blending Options" now under "Blending Options : Default" set the "FILL" opacity to 0% and then down the menu select "Pattern Overlay" , next to the pattern Image there's a small arrow click that and select the new pattern that we made earlier "Rain". Then set the blending mode to "Color Dodge" or whatever Mode you like, I think this is the best. Now click ok. you should have something like this:
7. Almost done, Now go to Window > Animation, you'll see that there's a new work place available right below your Image, now at the bottom right of that new work space there's a button that looks like this
Click that button, you'll see that the work space has changed into a time line, now in that menu select the arrow next to the highlighted layer name ( in my case it's layer 1 ) and scroll down to "style" and click that small clock. now move the Blue cursor to the far right side. And now go back to the layer and and right click on it and select blending Options again.
go to pattern Overlay, now move the menu to where you can see the background or your work space, Hold the Shift key and start dragging the "rain" down, you'll notice that the rain is going down but it's not ending, that's good, Drag it down four times, then click ok, now on the animation bar you'll notice that there's a little grey diamond, now move the blue cursor back to the starting point and click play to let it render the picture ( MAKE SURE YOU DRAGGED THE RAIN DOWN, OR ELSE THE RAIN WOULD FALL UP )
now you can play with the lighting of your original Image to make it look like it's dark and well a rainy weather and also to add special effects to make it realistic, Just play around with Brushes like brushing the bottom to make it look like the rain is falling on the ground or to make it look like blood, be creative also if you want to make the rain fall slower or faster you can click this button
and then click on "Document Settings" and choose whatever frame rate you want... **Note that there are better pics than this one, so don't judge this Tutorial By it.
8. Now you remember that Button that we clicked to get this animation bar, click it again ( on the bottom right corner ) it will ask you if you wanna do this click "continue" and wait for it to load... now you'll see some layers at the bottom, delete every layer above the layer 30 you can hold the Shift Key and go all the way to the last layer, and while holding the shift key select that last layer and using the Trash Can Icon delete those unwanted layers, you won't need them and it won't affect your animation we just wanna make the size of GIF smaller so that you can actually upload it.
9. You can also change the delay time by clicking the arrow under each layer, I put mine to "No delay" which is 0 . now got to File > Save for web and Devices, and hit save, and you're done.
***I hope this helped you guys, if not tell me what should I've done to make it better, Also the Sig I have right now was done by the exact same steps as above, though I added some effects on my own so it turned out good
Also let the Pic Load it's 14MB
If this pic doesn't work then you can see it
You must be registered for see links
You must be registered for see images
The Pic ( I already added the bottom brush thing in the bottom ):
You must be registered for see images
This Tutorial was made on Photoshop CS5.1 but it should be the same for CS3 and up.
Let's start.
1. Open the picture make sure you double click the Lock key on that layer, it will ask what to name it, just keep it layer 0, now make a new layer ( Ctrl-Shift-N ) and hit enter , then press ( Shift-backspace key ) this will bring up the Fill menu, set it to "50% Grey", it should look something like this :
You must be registered for see images
2. Next Go to Filter > Noise > Add Noise , make sure the amount is set to 400% , Gaussian and Monochromatic, then press ok. You should have something like this now :
You must be registered for see images
3. Now go to Filter > Blur > Blur , this will blur the noise a little bit so we can have a nice Rain effect in the end, now go to Image > Image Rotation > 90 CW, you'll notice that both layers are turned 90 degrees, you'll know why in the next step. Now go to Filter > Stylize > Wind , and make sure the Method is set to "Blast" , and the direction from "Right". now go to Image > Image Rotation > 90 CCW , you should have something like this :
You must be registered for see images
4. Now hit (Ctrl-I ) to Invert the colors, Go to Filter > Other > Offset, Now change the vertical amount until you see the white Line crossing the Image Like this :
You must be registered for see images
Now we want to remove this so that the rain won't seem like it's limited/ Cutting. Click ok and then using you're "Clone Stamp" Tool, Hold alt at any part of the "rain" and then brush over the white line until it's completely gone Like this :
You must be registered for see images
5. Go to Edit > Define Pattern, and let's name it "Rain" click ok, now you can delete the actual Rain Layer cause it has been saved in the Pattern Menu, so go ahead and delete it, Now make a New layer ( Ctrl-Shift-N ) and press ( Shift-Backspace ) and select 50% Grey again.
6. Right click on the new layer and select "Blending Options" now under "Blending Options : Default" set the "FILL" opacity to 0% and then down the menu select "Pattern Overlay" , next to the pattern Image there's a small arrow click that and select the new pattern that we made earlier "Rain". Then set the blending mode to "Color Dodge" or whatever Mode you like, I think this is the best. Now click ok. you should have something like this:
You must be registered for see images
7. Almost done, Now go to Window > Animation, you'll see that there's a new work place available right below your Image, now at the bottom right of that new work space there's a button that looks like this
You must be registered for see images
Click that button, you'll see that the work space has changed into a time line, now in that menu select the arrow next to the highlighted layer name ( in my case it's layer 1 ) and scroll down to "style" and click that small clock. now move the Blue cursor to the far right side. And now go back to the layer and and right click on it and select blending Options again.
go to pattern Overlay, now move the menu to where you can see the background or your work space, Hold the Shift key and start dragging the "rain" down, you'll notice that the rain is going down but it's not ending, that's good, Drag it down four times, then click ok, now on the animation bar you'll notice that there's a little grey diamond, now move the blue cursor back to the starting point and click play to let it render the picture ( MAKE SURE YOU DRAGGED THE RAIN DOWN, OR ELSE THE RAIN WOULD FALL UP
)now you can play with the lighting of your original Image to make it look like it's dark and well a rainy weather and also to add special effects to make it realistic, Just play around with Brushes like brushing the bottom to make it look like the rain is falling on the ground or to make it look like blood, be creative also if you want to make the rain fall slower or faster you can click this button
You must be registered for see images
8. Now you remember that Button that we clicked to get this animation bar, click it again ( on the bottom right corner ) it will ask you if you wanna do this click "continue" and wait for it to load... now you'll see some layers at the bottom, delete every layer above the layer 30 you can hold the Shift Key and go all the way to the last layer, and while holding the shift key select that last layer and using the Trash Can Icon delete those unwanted layers, you won't need them and it won't affect your animation we just wanna make the size of GIF smaller so that you can actually upload it.
9. You can also change the delay time by clicking the arrow under each layer, I put mine to "No delay" which is 0 . now got to File > Save for web and Devices, and hit save, and you're done.
***I hope this helped you guys, if not tell me what should I've done to make it better, Also the Sig I have right now was done by the exact same steps as above, though I added some effects on my own so it turned out good
Last edited: