- Joined
- Jul 23, 2010
- Messages
- 8,494
- Reaction score
- 724
~GIMP Tutorial~
Hey guys. I noticed that there are no tutorials for GIMP in GFX tutorials section, the ones that are available are only for Photoshop as almost everybody uses Photoshop. So i decided to make one 
Before we start with the tutorial there are few things you should have before hand
- Download
You must be registered for see links(its free)
- Download few fonts from sites like
*You must be registered for see links
*You must be registered for see links
*You must be registered for see links
Unzip the files & copy the fonts in this location C:\WINDOWS\Fonts
- Download brushes from here
You must be registered for see links
Unzip the file(s) & copy it in this location
C:\Program Files\GIMP-2.0\share\gimp\2.0\brushes
► TO CREATE A SCAN LINE PATTERN
There are few methods in which you can do it
Method 1: method 1 was created by YuLyn so the credit goes to her. I’m just re-creating it again.
Step 1: first open a new file with transparent background - Zoom in 4000%
file→new→set width and height to 2x2,3x3,4x4,6x6 etc depending on the requirement. I’ll select 6x6.
Step 2:select the pencil tool with color of your choice. I’m going to choose black. Fill the color diagonally or straight its left to you
Step 3: then save it as [name].png file. Then click on the image & copy it. After you have copied it, follow this step
Step 4: now click on patterns and refresh it,there you have your pattern
Method 2: In this method follow the first 2 steps mentioned above, then save it as [name].pat.
Now copy the file and paste it in this location
C:\Program Files\GIMP-2.0\share\gimp\2.0\patterns
Then again repeat the 5th step
End results:
Method 3: In this method follow the steps shown in pics
Method 1: method 1 was created by YuLyn so the credit goes to her. I’m just re-creating it again.
Step 1: first open a new file with transparent background - Zoom in 4000%
file→new→set width and height to 2x2,3x3,4x4,6x6 etc depending on the requirement. I’ll select 6x6.
Step 2:select the pencil tool with color of your choice. I’m going to choose black. Fill the color diagonally or straight its left to you
You must be registered for see images
You must be registered for see images
You must be registered for see images
You must be registered for see images
Method 2: In this method follow the first 2 steps mentioned above, then save it as [name].pat.
Now copy the file and paste it in this location
C:\Program Files\GIMP-2.0\share\gimp\2.0\patterns
Then again repeat the 5th step
End results:
You must be registered for see images
You must be registered for see images
You must be registered for see images
You must be registered for see images
You must be registered for see images
You must be registered for see images
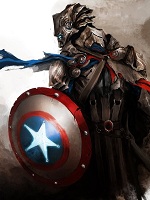
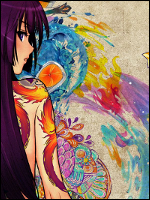
► TO CREATE AN AVATAR
Materials used:
Render
C4D wallpaper
Flare texture
You must be registered for see images
You must be registered for see images
You must be registered for see images
Step 1: Open an new file of size 450x600 and add transparent background to it. I’m choosing this size because its easy to work with, u can re-size it later.
Step 2: Now duplicate the layer as shown in the pic below. The layer 1 is where u r going to add the background & the layer 2 is where u will be adding the render.
Step 3: Now open the wallpaper shown above, crop the section u want to use and copy it. Now come back to gimp & paste the cropped section on layer 1. Now anchor the image to the layer 1 by clicking on the anchor button as shown in the pic below.
Step 4: Go to file→open and open the render from the location where u saved it. Now copy the render and paste it on layer 2, re-size the render so that the render fits inside your layer 2 as shown below
Step 5: Now change color of the render to match with that of the background.
See the pics
Step 6: Duplicate the layer 1, click on the duplicated layer then click on normal and set it to overlay with 40% opacity
Step 2: Now duplicate the layer as shown in the pic below. The layer 1 is where u r going to add the background & the layer 2 is where u will be adding the render.
You must be registered for see images
You must be registered for see images
You must be registered for see images
See the pics
You must be registered for see images
You must be registered for see images
You must be registered for see images
You must be registered for see images
You must be registered for see images
Step 7: Now add some details to the layer1. select brush tool→select suitable colo→rselect brush of your choice
Step 8: create a new transparent layer above the layer 2 (shift+ctrl+N), now open the flare texture, copy & paste the flare texture on this layer, resize it, anchor the pic & then click on normal→set it to screen with 60% opacity
Step 9: Now its time for little blending. Select the layer 2, then select the blur tool, set the opacity to 30% and convolve type to blur. Now start blurring around the render’s hair, hands etc… do not blur the face of the render, the rest u can blur lightly. See the pic after blending
Step 10 (a): now your avatar is done. You can now resize to 150x200 and save it as [name].png
You must be registered for see images
You must be registered for see images
You must be registered for see images
You must be registered for see images
You must be registered for see images
You must be registered for see images
You must be registered for see images
You must be registered for see images
- If u want to add square border follow these step
- ctrl+A
- click on select→border→fill the border with desired color→resize the image
You must be registered for see images
You must be registered for see images
- If u want round edges, then follow these steps
- after step 9→click select→rounded rectangle→set the radius to 30%
- again click select→invert
- select eraser tool→erase all the four edges or any two edges
- resize
You must be registered for see images
You must be registered for see images
You must be registered for see images
Still working on it
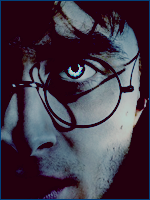
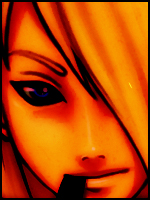
► RENDERING AN IMAGE
Before we start the tutorial lets look at few FAQ’s
What is a stock?
A regular picture. No cut outs. Usually JPEG files.
What is a render?
A cut out character, vehicle, scenery, etc. It has a transparent background. PNG, GIF’s supports transparent background
For this tutorial I’m going to select this image:
Step1: Open the image in gimp. Add transparent layer to it. Right click→layer→transparency→add alpha channel
Step 2: zoom the image to 400/800% by clicking at bottom left corner,check the pic below
Step 3: select free select tool or just press F key you’re your keyboard
Step 4: now start selecting around the image, hold shift key whenever necessary. While selecting, make sure you don’t select the lighter pixels( check the pics below to understand better). When selecting near the face be careful not to select the blue pixels from the background, as we don’t want it in our render.
Step 5: when you finish selecting the image looks something like this
now delete the selection by pressing Delete key from your keyboard.
repeat this step until only the character remains.
Final result:
sorry the render is not so good as I was in hurry to finish it for the tutorial
What is a stock?
A regular picture. No cut outs. Usually JPEG files.
What is a render?
A cut out character, vehicle, scenery, etc. It has a transparent background. PNG, GIF’s supports transparent background
For this tutorial I’m going to select this image:
You must be registered for see images
Step 2: zoom the image to 400/800% by clicking at bottom left corner,check the pic below
You must be registered for see images
You must be registered for see images
You must be registered for see images
You must be registered for see images
You must be registered for see images
You must be registered for see images
Final result:
You must be registered for see images
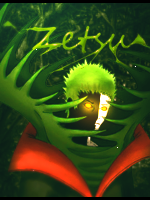
To create animated rain, open any image u want. I’m gonna select this image
Step 1: now that you have selected the image and opened it with gimp, now duplicate the layer 2 times
Step 2: Now create a new white layer by right click, duplicate this twice & place the white layer above the image as shown in the pics below
Step 3:Now select the white layer→ click on Filter→ Noise→ RGB Noise→ set any values in this range 0.65-0.7
Repeat this for the other two white layers also
Step 4: Again select the white layer, Filter→ Blur→ Motion blur→ set length to 40 & angle to 130→repeat it for other white layer also
Step 5: set the white layers to multiply mode and merge the white layer with the image below
Step 6: Filter→Animation→playback Now check whether ur animated rain works. If its working then save it as [name].gif
End result:
You must be registered for see images
You must be registered for see images
You must be registered for see images
You must be registered for see images
Repeat this for the other two white layers also
You must be registered for see images
You must be registered for see images
You must be registered for see images
You must be registered for see images
You must be registered for see images
You must be registered for see images
You must be registered for see images
You must be registered for see images
You must be registered for see images
You must be registered for see images
You must be registered for see images
You must be registered for see images
Last edited: